
Table of content
Create and Manage your TV Screens
Create and view your TV screens. You need a FireTV stick.
- Click the wrench "Config" icon in the top right and select "TV Signage"
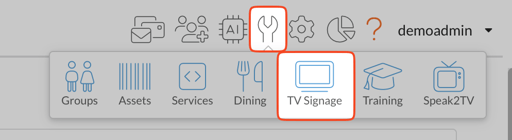
- Click "Create New" to add a new TV screen
- Click the edit icon to make changes to the TV screen
What the Slides page does
The Slides page is where you design a full-screen slide and send it to the TVs in your community. Everything happens in one place: build the slide, then schedule it to specific rooms for specific days and times.
A slide can hold anything you type or drop on it, plus live content blocks that pull from Prntyr itself - today's menu, the activity calendar, birthdays, resident and staff spotlights, and community messages.
The four areas of the screen.
| Area | Where | What it does |
|---|---|---|
| Left rail | Far left | Seven panels: Schedule, Text, Elements, Images, Content, Border, Templates. Click one to open it, click it again to close it. |
| Top toolbar | Across the top | Everything that changes the thing you have selected - font, color, alignment, layering, rotation, lock, delete. Grayed-out buttons mean nothing is selected, or the action needs two elements. |
| Canvas | Center | The slide itself, at 1920 × 1080 by default. Click an element to select it, drag it to move, drag a corner handle to resize. |
| Page strip | Bottom | Thumbnails of the pages in this slide, plus buttons to add a page, duplicate a page, step between pages, and delete a page. |
Save and Share sit in the top right. Save keeps your work in the Designs library; Share is how the slide gets to a TV.
Step 1 - Start the slide
Start from a template unless you have a reason not to. Templates are already sized for a TV and already match the brand.
- Click Designs in the top navigation bar.
- Search or scroll for a design and click to use.
- Or pick from Community Templates - slides your own community has saved and shared.
- Click any card to open it on the canvas. Replace the placeholder text with your event, and you're most of the way done.
- To start from nothing, click the page icon at the far left of the toolbar (New document).
Check the page size
Open Dimensions in the toolbar (the gold icon near the lock). It shows width, height, unit, and 19 presets. The ones that matter here:
- TV Screen - 20 × 11.3 in (1920 × 1080 px): the standard community TV slide
- Alexa Show 8 - 10 × 6.25 in and Alexa Show 15 - 20 × 11.3 in: for Echo Show devices
Set this before you lay anything out. Changing it later will shift your elements around.
Step 2 - Add what you type and drop
Everything you add lands in the middle of the canvas. Drag it where you want it and resize it with the corner handles.
Text
Four choices, all from the Text panel:
- Header - a large title, starts at 30 pt bold
- Text - a plain paragraph box
- Rich text - a box where you can mix sizes, weights and colors in one block
- Date - a date that fills itself in, so a slide that runs all week still shows today
Type straight into the box after adding it.
Elements
From the Elements panel:
- YouTube link - paste a video URL to play it on the slide
- Bullet list - a formatted list block
- Divider line - a rule for separating sections
- Table - rows and columns
- Icons - 68 searchable line icons (calendar, dining, coffee, fitness, music, heart, bell, and so on); type in the search box, for example, garden, dining, health
Images
From the Images panel:
- Add image places a picture on the slide
- Background image fills the whole page, either from Open media library (images your community has already uploaded) or Choose image file from your computer
- Fill mode controls how it sits on the page; Fade behind text dims it so words on top stay readable
- Remove background image takes it back off
Shapes and borders
The square icon at the left of the toolbar (Add shape) gives you Circle, Rectangle, Star, Half circle and Triangle. The one beside it (Background color) sets the page or element color, with community presets saved underneath.
The Border panel puts an outline on whatever you have selected - text, image, table, anything. A shape with a border and no fill makes a frame you can place other items inside.
Step 3 - Add live content blocks
This is what makes a Prntyr slide different from a poster. A Content block pulls real data out of Prntyr and keeps it current, so one slide can run for a month and show the right thing every day.
Each block opens the same two-part window: settings on the left, styling on the right with a live preview of how it will look.
| Block | What it pulls | Settings you choose |
|---|---|---|
| Menu | Meals from the dining menu | Start date, days range, calendar type (AL / IL), meal type (All, or one meal), restaurant, show meal title |
| Calendar | Events from the activity calendar | Start date, days range, calendar type, service (for example Activity), and which fields to show - Time, Title, Short Description, Location Name, Location Key, Category, Department |
| Messages | Community messages | Start date, days range |
| Birthdays | Resident birthdays | Start date, days range |
| Res Spotlight | Resident spotlight text | Start date, days range |
| Staff Spotlight | Staff spotlight text | Start date, days range |
Days range is how far forward the block looks. 1 means today only; 7 gives the week ahead on one slide.
On the right, every field gets its own font size, font family, font style, color, bold and underline. Watch the Preview at the top as you change them. Click Submit to drop the block onto the canvas, then drag and resize it like any other element.
Step 4 - Style and arrange
Select an element first - the toolbar only acts on what is selected. Hover any button to see its name. If the toolbar runs off the edge, use the arrows at either end to scroll it.
| Button | What it does |
|---|---|
| New document | Starts a blank slide |
| Background color | Sets the color of the page or the selected element, with saved presets and a transparency slider |
| Add shape | Circle, Rectangle, Star, Half circle, Triangle |
| Change font | Font family for the selected text |
| Font size − / + | Steps the size up or down |
| Font color | Color of the selected text |
| Bold weight, Italic | Standard text weight and slant |
| Text Alignment | Left, center, right, justified |
| Bullet list, Numbered list | Turns the text into a list |
| Line spacing, Letter spacing | Space between lines and between characters |
| Text style tools | Underline, Uppercase, Lowercase, Add link, Remove link |
| Rotate Clockwise / Anti-Clockwise | Turns the selected element |
| Copy element, Paste element | Duplicates an element |
| Bring forward, Send backward, Bring to front, Send to back | Controls what sits on top of what |
| Align elements | Left, center, right, top, middle, bottom - needs two or more elements selected |
| Align to page | Left, center, right, top, middle, bottom of the slide itself |
| Group / Ungroup elements | Locks several elements together so they move as one |
| Undo, Redo | Steps back and forward |
| Dimensions | Page size and presets |
| Lock | Freezes an element so it can't be moved by accident |
| Delete | Removes the selected element |
To select more than one element, hold Shift and click each one.
Step 5 - Publish it to the TVs
Click Save first. That keeps the slide in the Designs library (Designs → TV Slides) so you can reopen or reuse it later. Saving does not put it on a TV.
Then click Share. Five options:
- Print - send to a printer
- Create a PDF - download a PDF
- Create TV slide - schedule it to community TVs
- Create Alexa slide - schedule it to Echo Show devices (grayed out unless the page is set to an Alexa size)
- Export - download the file
The Create TV signage window
| Field | What to enter |
|---|---|
| Signage title | Required. What staff will see in the schedule list - make it specific, for example Fall Concert - Oct 3, not slide 2. |
| Replace my content daily | Leave off for a normal slide. Turn it on when the slide holds live content that should refresh each day rather than freeze on the day you made it. |
| Select rooms | Required. Pick every display it should run on - your community's own list, for example Community-TVs, front lobby, bistro, Dining, 2nd floor activity room. Add as many as you need. |
| Start date / End date | The first and last day it runs. |
| All Day | Check it to run the whole day and skip the time fields. |
| Daily start time / Daily end time | The window it shows within each day - for example a breakfast menu from 6:00 AM to 10:00 AM. |
| Repeat | Repeat off, daily, weekly, or monthly. |
Click Create Signage. Allow up to five minutes for it to appear in the schedule and reach the TVs.
Step 6 - Check and manage the schedule
Open Schedule in the left rail to see what is running. The heading shows the slide count for whatever you have filtered to.
The filter row across the top:
- Display - TV or Alexa
- Date range - from and to, up to 31 days at a time
- Location filters - by level of care, and by TV room
- Sort by - Time (when each slide runs) or Order (the sequence they rotate in)
The buttons above it:
- Refresh - reload the list; new slides can take up to five minutes to appear
- Reorder - switch into reorder mode, drag slides into the rotation order you want, then click Submit reordering
- New slide - start a fresh slide
Tips and common snags
Design for the back of the room. A TV slide is read from twenty feet away. Big type, few words, high contrast. If you can't read it at a glance on your monitor, nobody will read it in the lobby.
Save before you share. Save and Share are separate. A slide that was shared but never saved is not in your Designs library to reuse next month.
Nothing showing on the TV? Check three things in order: the date range covers today, the daily time window covers right now, and the room is in the list. Then click Refresh - new slides take up to five minutes.
Toolbar button grayed out? Either nothing is selected, or the action needs two or more elements (the align-elements group).
Moved something by accident? Undo is in the toolbar. Once a slide is laid out the way you like, use Lock on the background and logo so they can't be nudged.
Reuse instead of rebuilding. Duplicate an existing slide from the page strip, change the details, and share it with new dates. Slides your community saves can show up under Community Templates for everyone.
Alexa option grayed out? The page is still at a TV size. Open Dimensions and pick Alexa Show 8 or Alexa Show 15 first.