Table of content
Setting up your event with "Registration" (Attendance)
The ability to "Take Attendance" is "turned on" by default for every event and meal. This means you can take attendance without needing to "turn it on." However, you will notice a toggle for "Registration". When this is turned "on" or enabled, it means the resident can register for the event. There are three ways this can be done. Residents can register on the Neighbors app or web, or via Alexa. Alexa will ask the resident if they want to attend the event. If the resident says "yes" it will move them to the registered column. If this is not turned on, Alexa will not ask the resident if they want to attend. Events can also be registered by a family member using the Community App.


Waiting List
If you are using the service library feature (not simple calendar entries) you have access to the Waiting List feature. The waiting list is an way to allow residents to register for events with a maximum capacity and be put on a waiting list either manually by staff, or automatically based on the order in which they registered. You have the choice to make the waiting list automatic or to manage it manually. The amount of registrants available is determined by the max capacity of your event location/asset.
If the wait list is turned off, the min and max capability do not have any impact on the registrants. For example, if you have a max capacity of 100 for an event, 105 people can register, and the decision on how to handle is the hands of the user.
If waiting list is turned on, users are prevented from registering if the max capacity is reached.
When the waiting list is automated, people are put in a first come, first serve order. E.g., if I am 1st on the waiting list, I will be first to be added to an event if a space opens. In this case, the Registration and Waiting list are not editable.
To make these columns editable, you must unselect "Automate Waiting List"
You can control the max capacity and waiting list automation in the staff app as well. The staff app works in both portrait and landscape modes.

Residents are notified when they register for an event or are put on the waiting list. Notifications happen throughout the entire lifecycle of an event. E.g., if they are moved from the waiting list to the registered list, they will be notified. Notifications happen on Alexa, text and email.
How to take Attendance on the Web
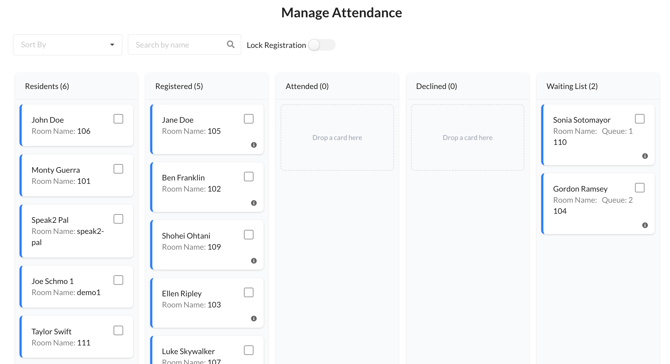
You can manage Registrations and Attendance by dragging names to the appropriate column. Note, you can select multiple names at once by using the checkbox, and drag multiple residents at once.
- Click the Calendar view
- Click the specific event you want to update attendance for
- Sort by First, Last or Room #
- Select one or multiple and drag to Attended or Declined. Mark their participation level for one or multiple by multi selecting
How to take Attendance on the App
Follow the below steps in the Staff app to take attendance.
- Open the App and click Calendar
- For the activity you want to take attendance, slide right to left to open Attendance

- Select one or multiple names by tapping the names quickly. Drag them to the Attended or Declined column as needed.
- Mark their participation level for each. You can select one or multiple to change.
How to take Attendance on Alexa
You can take attendance for an event using an Alexa device at the time of the event.
- Alexa will only recognize Activities scheduled within 30 minutes of the current time. If it is 30 minutes after the start time of an event, Alexa will not recognize it.
- Once an activity has been started, Alexa will recognize it for 90 minutes.
- If you move the start time of an activity that was already "started" by Alexa, it will not recognize the new time.
Watch how to use Alexa to take attendance real-time:
The video below guides you through using an Alexa device in real time to take attendance. Be sure to watch the second video below for the touchscreen approach as well.
Steps to take Attendance on Alexa
Start by enabling the Alexa at your location:-
- You say, "Alexa, open Speak2"
- Alexa will say "Welcome to the Speak2 Assistant, how can I help you?"
- You say, "Start activity." You must have an activity scheduled for this feature.
- Alexa says the name of the upcoming activity(s), for example,"Yoga at 3:00 PM", then "Would you like to start this activity?"
- If Alexa reads off the wrong Activity name, respond NO and check your calendar in the Speak2.Live portal.
- If you say YES, Alexa will ask, "Would you like to know who has signed up?"
- If you say YES, she will read those who registered. If you say NO it will proceed.
Resident or Staff checking in via Alexa
- Residents/Staff can tell Alexa, "Alexa, tell everyone [NAME] is here"
- Alexa will confirm if it recognizes the name and mark the person as attending the event.
If you say “Alexa, tell everyone I’m here” a touch screen to select one or more people at once.
3. Close the Activity
- First, say "Alexa, open Speak2", the tell Alexa, "Alexa, close activity."
- Activities are automatically closed after 90 minutes.
4. You can view and edit attendee information in Speak2 Live or the Staff App
Watch how to take Attendance on the touchscreen on Alexa
You must first "start" the event. This method is best for staff to use during an event.
Download this document for written instructions: Printable Instructions