Table of content
Create a Daily Calendar
- Click Prntyr on the bottom left navigation in your Speak2 portal
- You should be automatically logged into Prntyr. If you are not, just enter your Speak2 user name and password.
- Click either Newsletter or Slides in the top navigation. For this article we will be selecting Slides.
- Go to the Speak2 Content section on the left side of the page and select "Calendar" to grab your calendar events, or Menu if you're building a menu to print.
- Select your "content type" like Calendar
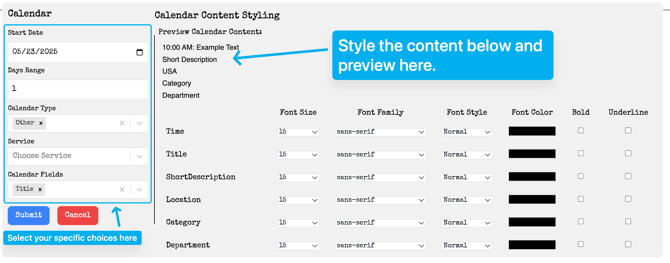
- Follow the content based on your goals as shown in the image here:
- Hit submit and your slide will populate with the content from Speak2
- Use the Edit buttons to make edits, change fonts, and more. See below for some highlights and tips.
TIP: Placing the content in a table allows you more flexibility in changing the style of specific elements, such as making time bold, etc.
Style Your Daily Calendar
- Now that your content is on the canvas, you can manipulate it in a variety of ways to make it visually appealing.
- Content in table

- Content without Table

- Content in table
- The below sections will provide specific tips on how to use the top and left toolbars and what they do. You can also use one of the prebuilt designs from the Designs section of Prntyr to get you started.
Add Content Elements
You can design your daily printing using the canvas (main area that will be printed) and the controls on the left and design elements at the top of the canvas area.
- Using the left side bar, drag any controls onto the canvas. You can edit them and make them look how you want using the top toolbar. E.g., you can drag the Paragraph control to the cavas and change the font, color and size of the text of the paragraph.

- Move the controls to anywhere on the canvas by clicking and holding and dragging the item.
- Resize the items by double-clicking and dragging the circle on the bottom right of the control object

The Date control can be used at the top of your daily sheet. It will automatically update every day for you.
Images
- Drag the image control to the canvas
- You can either select an existing images from the provided images, or click My Images to use one of your previously uploaded images
- See below for hints on managing images in your design

Aligning Controls
- Select any controls by holding down the Shift key and double clicking an item OR by dragging the mouse from top left across the canvas.
- Open the Alignment icon

- Align as needed. Click anywhere in the canvas to unselect all items.
NOTE: The top toolbar has many ways to manage your design and content. These should be familiar if you have used similar tools int he past such as MS Word or Canva.
Created an Automated PDF
Receive a PDF of each day’s content delivered to your email every morning by following these steps.
- Finalize your design and ensure you have your content set from your Speak2 content.
- Select "Create PDF" on right side of the screen

- Fill in the fields to configure your automated PDF emails and click Submit

- You will receive an email with a PDF for you to Print every morning with the content for that day
If there are changes to be made, make them in the Speak2 calendar and generate a new PDF by selecting the Template and printing the new export.