Table of content
Create your Service Activity Calendar
Create your activity, event, engagement or programming calendar with services. You can add waiting lists, automated reminders, cost tracking, room locations and more.
- Create your location assets (i.e. rooms and areas you host events)
- Create your Services (i.e. herb planting grass in the Courtyard)
1. Create your services for your calendar
Create your activities in the Services Library or from the calendar by clicking the + button or on the Daily calendar.
Creating Activity Services from the Service Library
- Click Services from the top right navigation
- Click Activities or your desired category
- Click Create Service
- Fill in your activity details
- Name, location, short description, long description
- Turn on "Display in Signage"
- Upload an image or use your preconfigured Service Activity Template
- Select the screens to display this on
- Add your Communication preferences
Active Available to use on the calendar Bookable This determines if the service is displayed to the Neighbors app and web. Bookable means residents can view this service. If this is not checked, only staff can see it. Registration People can register for this event. Waiting List Manual When max registration capacity is met, people are moved to a waiting list that only Staff can manage. Waiting List Automated When max registration capacity is met, people are automatically moved back and forth from Waiting List to Registered as spots become available for the event. Share to Calendars Add to Resident and Staff calendars if applicable Display in Signage Rotate on screens - target specific screens Comments This determines if the service allows for comments to be added by staff and residents. Auto Announcement Automatically send an Alexa, email and text announcement N minutes before the activity Auto Notification Automatically send an Alexa, email and text a notification N minutes before the activity Registered/ All Send to everyone or only to those who registered (toggle blue is all) Share Share this service to your organization or to all (toggle blue is all) - Fill in your Wellness details (this is for resident matching!)
- Add in any additional information such as External Costs
The Location asset sets the minimum and maximum participants.
To change this, click the activity or event and change the number as desired and click Save.
2. Create Activities from the Daily Calendar
- Click the + button or on the Daily Calendar
- Choose a template as base or enter in your information in the blank form
- This does not include your Wellness details. Those must be added in the Service Library.

- Click the microphone to record your own voice
- Add a Short Description. This will show up on Alexa.
- Select your Location, Start Time and End Time
- Choose a Start Time and End Time
- Select the Groups that have access to this event
- Select Registration if applicable and then Automated or Manual waiting list
- Select Announcement for auto announcements before the event
- Click Display in Signage and select the screens to show this event
- Select your calendar types
- Click Save to save one time or "Save as new Service" to save it as a template
Resident matching/Dow/goals
Create your calendar from the Daily View
- Calendar > Daily View
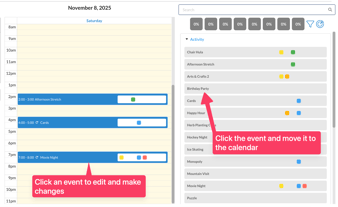
- See your templates on the right and drag and drop an event to the calendar
- Or click a time on the calendar and select your event
- Drag your activity or event from the service library onto the calenda
- Click into the activity to edit any details.
E.g. repetition, signage image, short description, location, registration, etc. - Click on the calendar or the + button to create a brand new service calendar event. You can create one from scratch or use an existing service.
Each service has pre-configured announcements, notifications and alerts.
Once the activity is dragged and dropped, these are automatically added.
If you want to edit a template, double click the template in the right side accordion. The template will open up.
Waiting list and lock registration
| Waiting List |
Details |
| Automated | Registration is defaulted to Automated. When someone unregisters, the first person in the waiting list queue will be added and notified. |
| Manual |
A waiting list is enabled. When someone unregisters, staff will move someone to the Waiting List column to Registered or another column. |
| Lock Registration (toggle is blue) |
"Lock" registration by turning on the Registration Lock toggle above the attendance view. When you lock registration, nobody can register OR unregister for an event. Only Staff can change the Attendance lists when locked. Users are sent a message that the event is locked. |
When you lock registration, nobody can register OR unregister for an event.
Only Staff can change the Attendance lists when locked. Users are sent a message that the event is locked.
View your DoW on Monthly Calendar
Create calendar events or view your calendar with the DoW. Whatever color is shown is the primary DoW for the event. Visit the Daily Calendar to view more details or click the event.
- Click Calendar from the left hand navigation
- Click the Monthly tab
- Click + Service Activity to create a new activity
- Click + Simple Activity for a simple activity
Match your dimensions of wellness to your calendar goals. Visually see if you are hitting your goals on the Monthly calendar and analyze to see a percentage report. More info here!

Attendance
Manage Registrations and Attendance by dragging names to the appropriate column.
Select multiple names at once by using the checkbox, and drag multiple residents at once.
Troubleshoot Calendar
-
Check the Calendar Type, Level of Care and Group
-
If someone isn't receiving content, check their level or care or assigned calendar type
-
Check the location is created in Assets, not Room Management
- Check your Repeating settings if there is a day opted out or a non repeating event
- Check your Registration settings (do you have a waiting list turned on? Is it locked?)